Precise Z-Offset Calibration for Klipper: Barbara Roufs' Measurement Techniques
Introduction: Achieving perfect first-layer adhesion in 3D printing is crucial for successful prints. Incorrect Z-offset can lead to disastrous results, from nozzle crashes to failed adhesion and ultimately, wasted filament and time. While Klipper, the popular 3D printer firmware, offers robust features, achieving precise Z-offset calibration remains a challenge for many users. This article delves into the meticulous measurement techniques developed by Barbara Roufs, providing a step-by-step guide to achieving pinpoint accuracy. This method goes beyond the typical "feel" method and offers a more scientific and repeatable approach.
Why Precise Z-Offset Matters
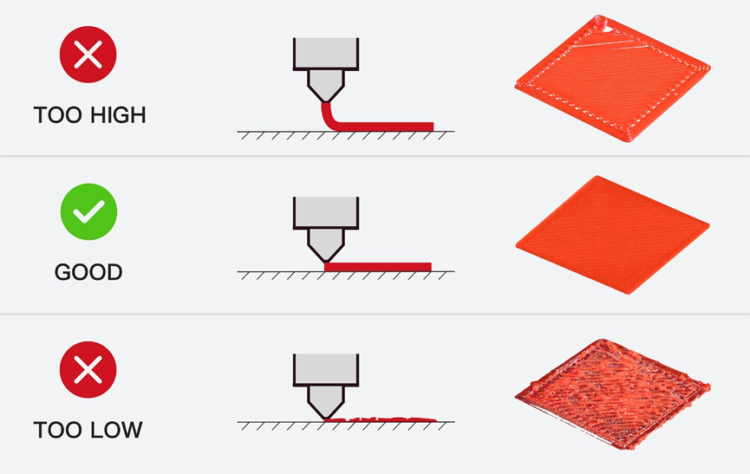
A correctly calibrated Z-offset ensures your nozzle is the perfect distance from the bed, allowing for optimal first-layer adhesion. Too high, and your nozzle will print in the air; too low, and you'll risk scratching or damaging your bed, leading to clogged nozzles and ruined prints. The consequences of an inaccurate Z-offset can include:
- Poor first-layer adhesion: The most common issue, leading to warping and print failures.
- Nozzle clogs: Excessive pressure from the nozzle being too close to the bed can force material into the nozzle, causing clogs.
- Bed damage: Repeatedly scraping the nozzle against the bed can scratch or damage its surface.
- Wasted time and materials: Correcting a poorly calibrated Z-offset often means reprinting failed prints, wasting valuable time and filament.
Barbara Roufs' Methodology: A Step-by-Step Guide
Barbara Roufs' approach emphasizes precision and repeatability, moving beyond subjective assessments. Her method leverages the power of Klipper's features and meticulous measurements. Here’s a breakdown of her technique:
1. Preparing Your Printer:
- Ensure your bed is perfectly leveled. Use a reliable leveling method, such as a feeler gauge or an automatic bed leveling system.
- Install and configure Klipper correctly. This includes configuring your
printer.cfgfile appropriately for your specific hardware.
2. The "Baby-Step" Approach:
This is where Klipper shines. The SET_ADJUST command allows for fine-tuning the Z-offset in small increments (baby steps). This eliminates the need for large adjustments, making the process much more precise.
3. Measuring the Gap:
This is the core of Barbara Roufs' technique. Instead of relying on visual estimation, she employs precise measurements.
- Using a feeler gauge: This provides a highly accurate measurement of the gap between the nozzle and the bed. Start with a feeler gauge slightly thicker than your desired gap (typically around 0.1mm - 0.2mm).
- Adjusting with baby steps: Gradually adjust the Z-offset using the
SET_ADJUSTcommand in Klipper's terminal, aiming for a consistent feeler gauge fit. Use small increments (e.g., 0.01mm) and observe the result.
4. Iteration and Refinement:
This process often requires several iterations. Continue adjusting the Z-offset, measuring with the feeler gauge until you achieve a consistent, tight fit without resistance.
5. Testing:
Print a small test print to verify your Z-offset. This is where you can see if the first layer is adhering properly. This allows final adjustments if necessary.
Conclusion: The Benefits of Precision
By utilizing Barbara Roufs' meticulous measurement techniques, you can achieve a level of Z-offset precision that significantly improves your 3D printing results. This method reduces guesswork, minimizes waste, and ensures consistently successful prints. Remember, patience and attention to detail are key to mastering this technique and reaping its rewards.
Call to Action: Try Barbara Roufs' method and share your results! Let us know in the comments how this improved your 3D printing workflow. What other techniques have you found successful for Z-offset calibration?

